Mason Jar Salad with Balsamic Vinaigrette

Screen Shot 2020-06-07 at 1.33.05 PM.png

There is nothing like the taste of fresh crisp lettuce with summer vegetables tossed in my homemade balsamic vinaigrette. I’ll admit it, I am an absolute salad lover. While we all need to get a nice variety of vegetables into our diet, it’s important that we consume vegetables in both the raw and cooked forms. When vegetables are consumed raw, Mother Nature’s digestive enzymes are retained, which give our pancreas a break from having to make its own. This is one of the major reasons eating salads makes us feel light and refreshed. Cooking certain vegetables, on the other hand, (such as carrots, tomatoes, bell peppers, asparagus, and cabbage) increases certain antioxidants such as lycopene, which helps lower inflammation in the body by fighting free radicals. In addition, cooking vegetables pre-digests the fiber for our gut, allowing us to consume more vegetables without getting too full.

While salads are a great meal option, many patients are not willing to make them if they need a quick grab and go lunch or dinner. This is why my mason jar salad (which is made the night before) is a great choice for busy patients who still want to maintain a healthy diet!

Ingredients:

Mason Jar Salad (serves 1)

  • 1/2 cup cooked quinoa

  • 1/4 cup steamed broccoli

  • 1/4 cup fresh mango, cubed

  • 1/4 cup of freshly sliced cherry tomatoes

  • 1/4 cup walnuts (raw or dry roasted)

  • 2 cups baby spinach

  • Homemade balsamic vinaigrette (see ingredients below)

Balsamic Vinaigrette (makes 6 servings, 2 tbsp each)

  • 3 tbsp balsamic vinegar

  • 5 tbsp water

  • 4 tbsp olive oil

  • 1/2 tsp minced garlic

  • 2 dashes sea salt & pepper

Instructions

1) Add all ingredients (except balsamic vinaigrette) to large mason jar, layering in same order as listed above.

2) Put balsamic vinaigrette ingredients into a bottle with a tight-fitting lid and shake vigorously until well combined.

3) When ready to eat, pour salad into large bowl and toss with homemade dressing. Enjoy!

Chicken Lettuce Wraps

Screen Shot 2020-05-15 at 2.05.04 PM.png

It’s time to spice up your diet with an all-time prized ethnic dish of mine, modified of course to meet Miss Alexa’s standards! Chicken lettuce wraps have been a meal that has been enjoyed for years in my household, but definitely needed an ingredient list makeover that was free of genetically modified soy, gluten-based thickeners, and MSG (monosodium glutamate) additives. This recipe does just that, while still providing that delicious flavor and nutritional quality.

This recipe contains one of my favorite alternatives to soy sauce, known as coconut aminos. Coconut aminos is derived from the sap of the coconut tree, which is allowed to ferment over time. The fermentation imparts a nutty flavor to the coconut aminos, making it a great alternative to soy sauce. My chicken lettuce wraps are topped with antioxidant boosting vegetables including carrots, water chestnuts, bok choy, and green onion. Medicinal herbs are also added to the mix including ginger (which helps promote intestinal health) and cilantro (which acts as a powerful detoxifying agent). If you are looking for a satisfying recipe that packs crunch and flavor at the same time, you will love my new take on chicken lettuce wraps. Enjoy!

Ingredients:

Serves 3

  • 1 pound of ground chicken

  • 1 head of boston lettuce (rinsed, dried, and divided into individual leaves)

  • 3 tablespoons coconut aminos

  • 1 tablespoon coconut oil

  • 1 tablespoon minced ginger

  • 2 tablespoons cilantro (thinly sliced)

  • 2 medium carrots (julienned)

  • 1 eight ounce can of water chestnuts (drained and rinsed)

  • 2 green onions (diced)

  • 2 baby bok choy (thinly sliced)

  • Sea salt and black pepper to taste

Instructions

1) Place rinsed/dried boston lettuce leaves in the refrigerator to crisp.

2) Melt coconut oil in a large skillet, then add ground chicken and coconut aminos. Cook for 4-5 minutes, then add carrots, water chestnuts, and green onion. Cook for an additional 3-4 minutes, stirring throughout.

3) Add minced ginger, cilantro, and baby bok choy to skillet. Season with salt and pepper and stir. Cook for an addition minute.

4) Place mixture into a large bowl and serve on lettuce wraps. Enjoy!

Cream of Zucchini Soup

Screen Shot 2020-05-02 at 5.05.13 PM.jpeg

It’s time to boil and blend my friends. This recipe is an absolute favorite of mine due to its ridiculously easy preparation and savory flavor. If you are not one who is kitchen savvy, I promise you this recipe is pretty much fail-proof for all who attempt it. Many patients may argue that boiling vegetables is not ideal, since a good majority of the vitamins and minerals are lost in the water that is discarded. No need to be concerned with that problem in my cream of zucchini soup, since the broth used to boil the vegetables is consumed in the final product! Miss Alexa is all about nutritional quality.

May marks the season for starting my vegetable garden, and zucchini is one of the top crops I intend on planting this summer. From zucchini pastas, soups, and breads, the options for cooking with zucchini are endless. In addition to its versatility in recipes, zucchini also provides our bodies with Vitamins A, C, manganese, and lutein, all of which promote healthy vision and better eyesight. In addition, the skin of the zucchini is one of the most treasured parts, since it contains the bulk of the dietary fiber which is necessary for proper digestive function. Lastly, the deep dark green color of the skin is packed with carotenoids, which serve as antioxidants to help fight off inflammation (which is the root of all chronic illness). Once you start making blended soups, the vegetable combinations and varieties are endless!

Ingredients:

Serves 4

  • 4 cups of chicken broth

  • 1 onion (yellow or sweet)

  • 3 medium zucchinis

  • 2 garlic cloves

  • Sea salt and black pepper to taste

Instructions

1) Chop onion and slice garlic cloves. Add to a large soup pot with chicken broth. Chop zucchinis into thick chunks and add to soup pot as well.

2) Turn stovetop to high heat and bring broth and vegetables to a boil. Turn heat down to medium and cook (with pot covered) until vegetables are tender (about 20-25 minutes).

3) Place broth and cooked vegetables into a high speed blender and blend until smooth. Pour into soup bowls and sprinkle with salt and pepper. Enjoy!

Chickpea Pizza Crust (Egg-free!)

Screen Shot 2020-04-26 at 11.27.33 AM.png

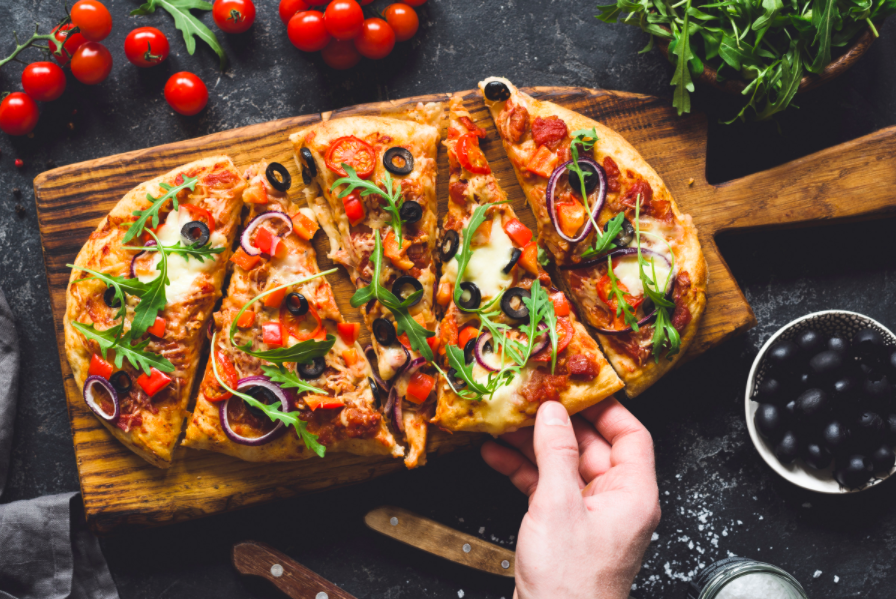
Yes, you read the title of this one right. A pizza crust made exclusively from a bean (as well as flaxseed for some binding support). Since the majority of my patients have many dietary restrictions, one of my major goals is to provide them with recipes that are delicious, nutritious, and free of any food intolerances. This is a recipe that is loved by many, due to its clean ingredient list that excludes all gluten, dairy, grains, and eggs.

You may be wondering how a pizza crust can possibly be made with just chickpeas, water, and some flaxseed? The magic is in the proportion of ingredients as well as one of my favorite egg substitutes, known as the “flax egg”. When ground flaxseeds are allowed to soak in water, they form a gelatinous and thick substance similar to an egg. This flax egg acts as an emulsifier by binding the other ingredients of this recipe to form a nice dough. This recipe is loaded with fiber, which helps regulate cholesterol, blood sugar, and healthy bowel movements. In addition, the chickpeas provide calcium, zinc, and Vitamin K, all of which promote healthy bone structure. It’s time for a new take on pizza that will nourish your body while treating your taste buds!

Ingredients:

  • 3 tbsp ground flaxseed

  • 6 tbsp water

  • 1 can of chickpeas (also known as garbanzo beans) strained and rinsed

  • 1.5 cups of chickpea flour

  • 1 tsp garlic powder

  • 1/2 tsp sea salt

  • 1/2 cup water

Instructions

1) Soak 3 tbsp of ground flaxseed in 6 tbsp of water and let sit for 5 minutes to form flax egg. Add all ingredients (including flax egg) to food processor and blend until a nice dough forms (feel free to add extra water if necessary).

2) Spread dough onto a pan lined with parchment paper or a pizza stone (brushed with coconut oil). Make sure to spread the dough thin.

3) Bake at 425 F for 15-20 minutes. Remove from oven and add preferred toppings (tomato sauce, spinach, olives, sautéed onion, arugula, basil, etc.). For dairy-based and dairy-free cheese toppings approved by Miss Alexa, please click here: https://www.missalexanutrition.com/fermented-foods

4) After toppings are added, place pizza back into oven and cook for another 10 minutes or until crust is to your liking. Enjoy!